TODO
Demo
Visit https://diplomatic-todo.replit.app for a live demo. Open in multiple tabs or on multiple devices and note the todos sync in real-time.
Source code is at https://replit.com/@masonicboom/TODO#src/App.tsx.
Usage
npm create vite@latestcdinto that directorynpm install @interncom/diplomatic- Configure
vite.config.tsto targetes2022for top-level await support (used in our fork of libsodium.js).
export default defineConfig({
  plugins: [react()],
  server: {
    host: '0.0.0.0',
  },
  build: {
    target: 'es2022',
  },
  optimizeDeps: { esbuildOptions: { target: 'es2022' } },
})- Then, change your
App.tsxto this.
import './App.css'
import consts from './consts.json';
import { useCallback, useState } from 'react';
import { DiplomaticClient, htob, idbStore, EntityDB, btoh } from '@interncom/diplomatic'
import { ClientStatusBar, InitSeedView, useStateWatcher, useClientState, useSyncOnResume } from '@interncom/diplomatic';
import Todo from './Todo';

export interface ITodo {
  text: string;
  done?: boolean;
}
const opType = 'todo';

const stateManager = EntityDB.stateManager;
const client = new DiplomaticClient({ store: idbStore, stateManager });

const hostURL = consts.hostURL;

async function getTodos() {
  return EntityDB.db.getAllFromIndex(EntityDB.entityTableName, EntityDB.typeIndexName, IDBKeyRange.only(opType));
}

export default function App() {
  useSyncOnResume(client);
  const state = useClientState(client);
  const link = useCallback(() => { client.registerAndConnect(hostURL) }, []);

  const todos = useStateWatcher(stateManager, opType, getTodos);
  const [valueField, setValueField] = useState("");
  const handleSubmit = useCallback(async (evt: React.FormEvent) => {
    evt.preventDefault();
    const todo: ITodo = { text: valueField };
    client.upsert<ITodo>(opType, todo);
    setValueField("");
  }, [valueField]);

  const handleChange = useCallback(async (eid: string, text: string, done: boolean) => {
    const todo: ITodo = { text, done };
    client.upsert<ITodo>(opType, todo, htob(eid));
  }, []);

  const handleDelete = useCallback(async (eid: string) => {
    client.delete(opType, htob(eid));
  }, []);

  if (!client || !state) {
    return null;
  }

  return (
    <>
      <ClientStatusBar state={state} />
      {state.hasSeed ? (
        <>
          <h1>TODO</h1>
          {todos?.map((ent) => {
            const todo = ent.body as ITodo;
            const hex = btoh(ent.eid);
            return <Todo key={hex} eid={hex} todo={todo} onChange={handleChange} onDelete={handleDelete} />;
          })}
          <form onSubmit={handleSubmit} style={{ marginBottom: 48, marginTop: 18 }}>
            <input id="value-input" type="text" value={valueField} onChange={(evt) => setValueField(evt.target.value)} placeholder="Type a todo ↵" style={{ width: "100%", boxSizing: 'border-box', padding: 4 }} />
          </form>
          {
            state.hasHost
              ? <button type="button" onClick={client.disconnect}>UNLINK</button>
              : <button type="button" onClick={link}>LINK</button>
          }
          <button type="button" onClick={client.wipe}>EXIT</button>
        </>
      ) : (
        <InitSeedView client={client} path="/" />
      )}
    </>
  );
}
Do
npm run devand open the URL it provides.Push the Generate button, choose a username, hit enter or INIT, and save the password when prompted.
Now you’ll see a screen like this. The green light next to
SEEDindicates the client now has a cryptographic seed in place (used to encrypt operations and authenticate with hosts, via derived keys).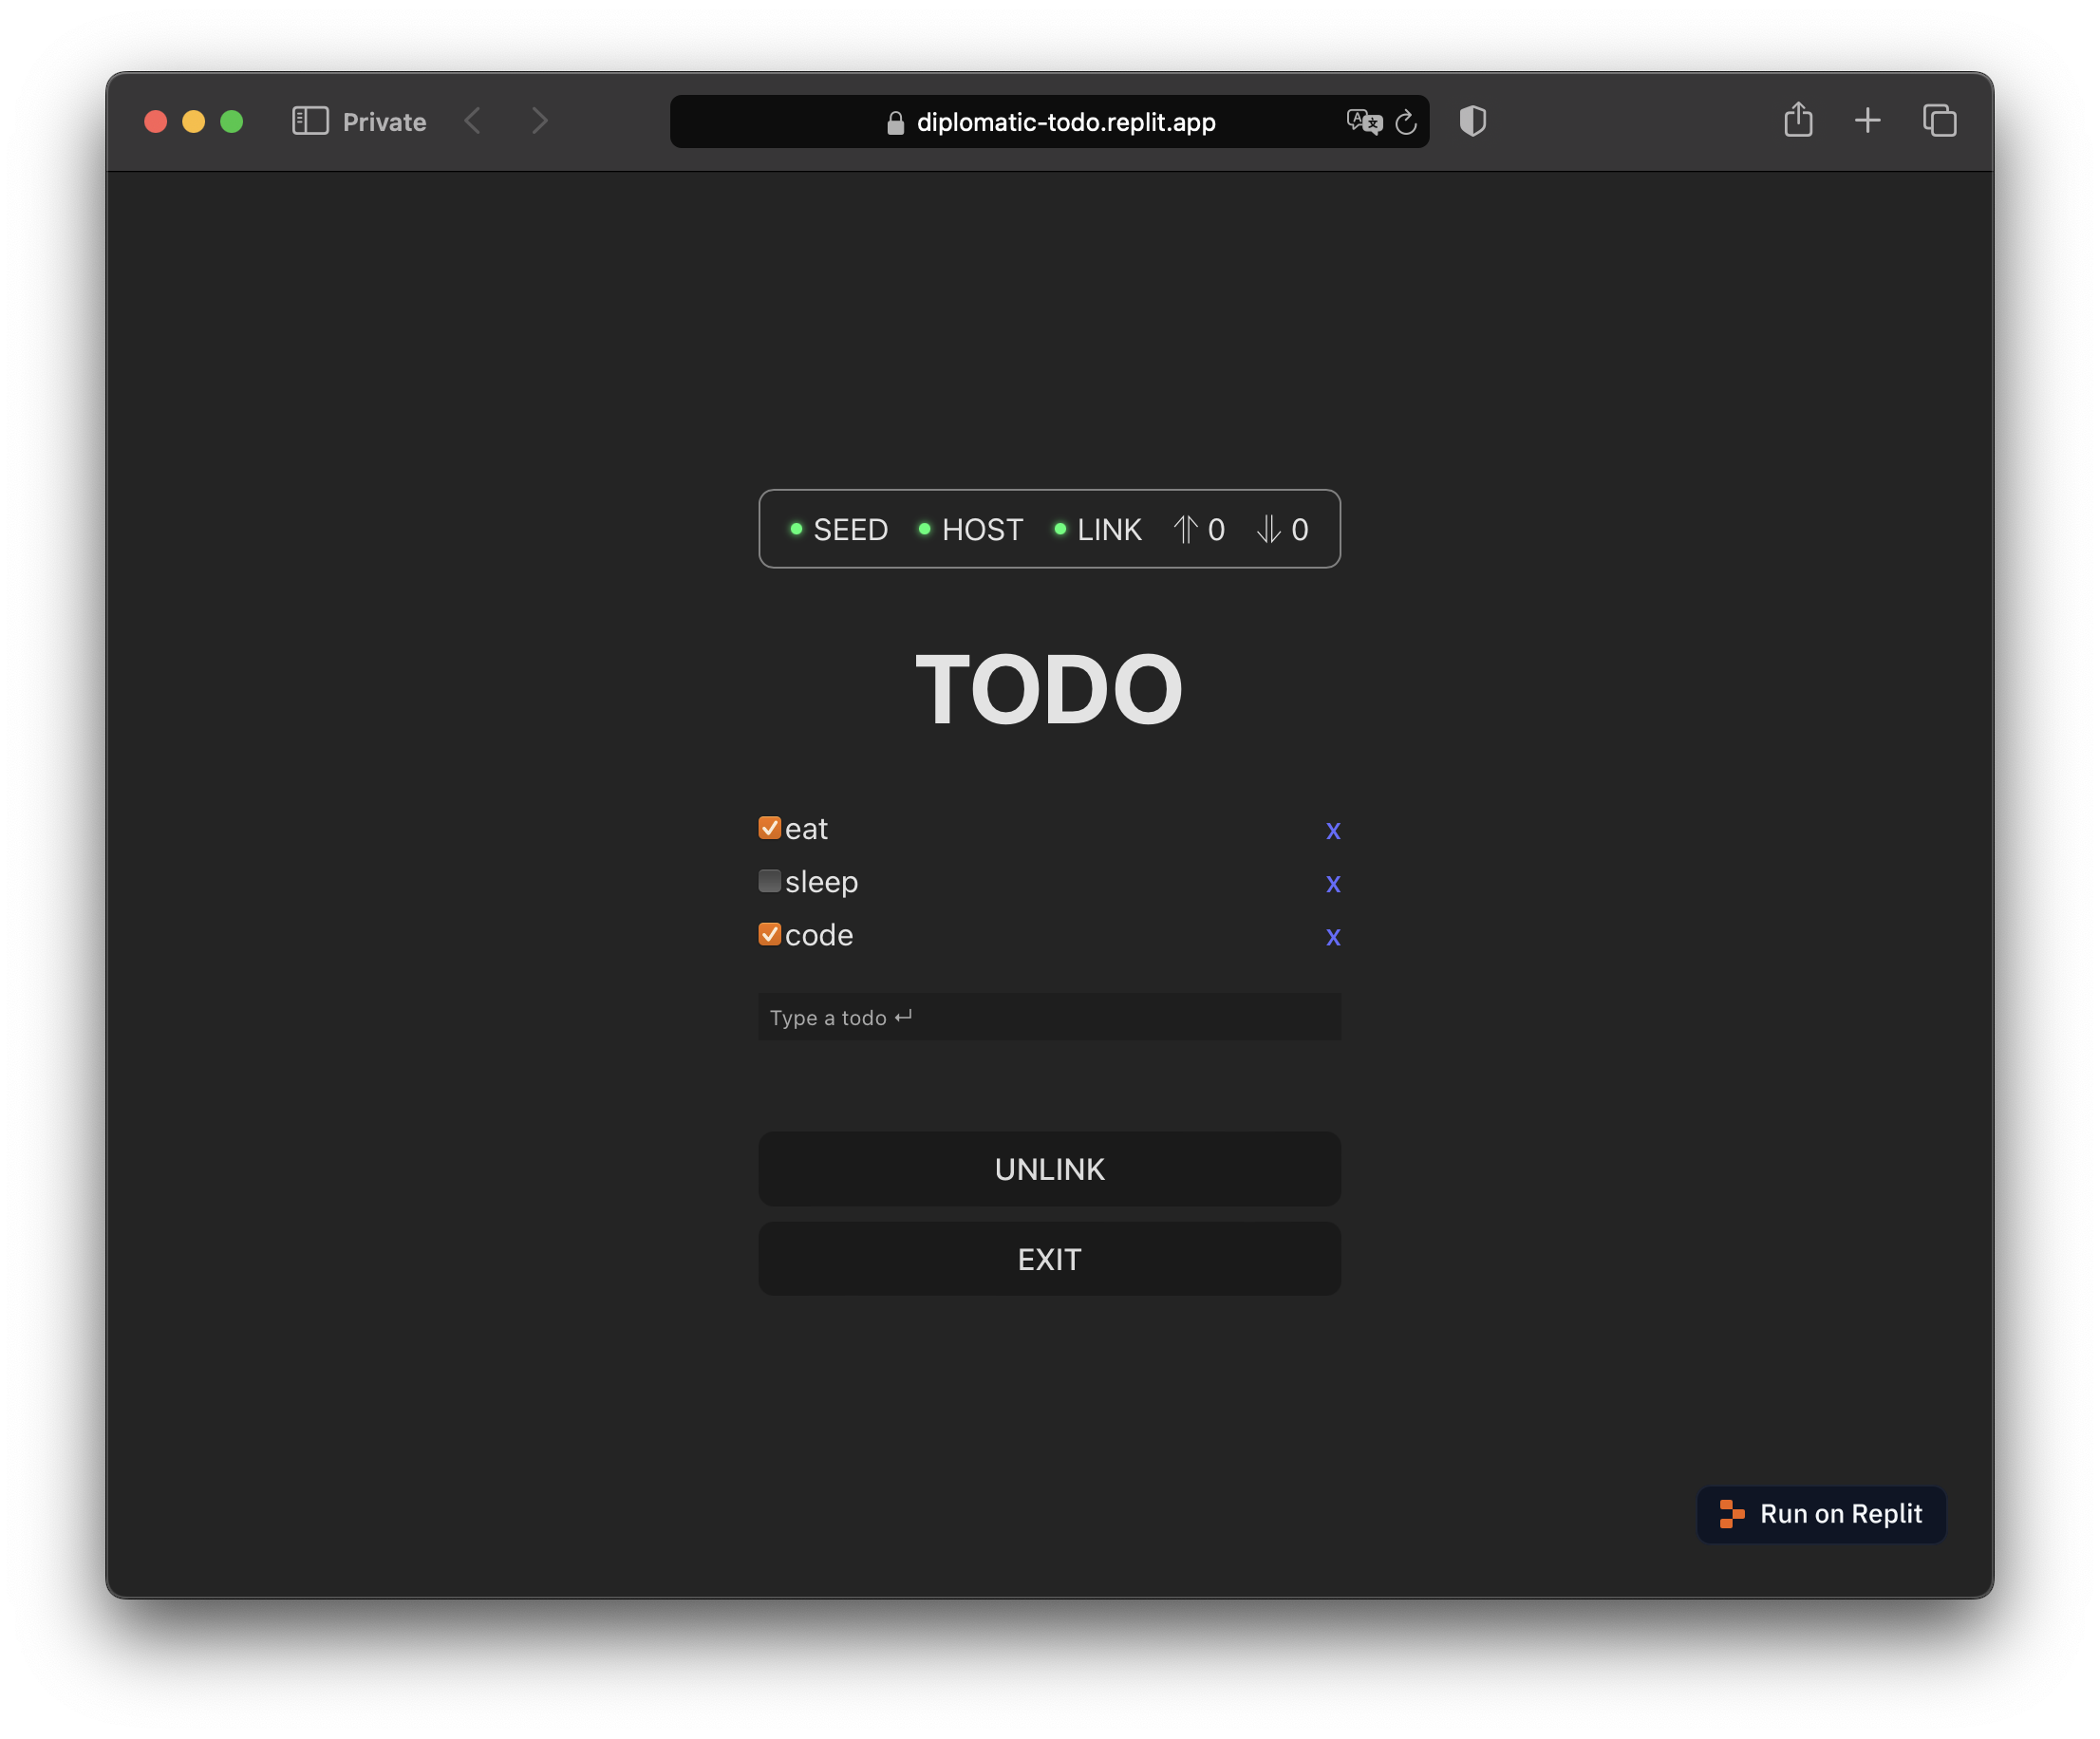
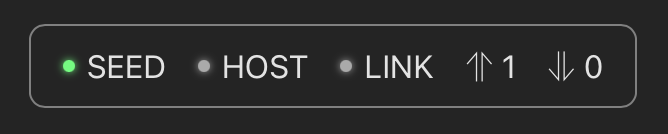
Type a todo and hit enter. Notice the up arrow in the status bar has a
1next to it. That indicates 1 operation is queued for upload. Type a few more if you like. Check and uncheck todos. Delete some.Push the
LINKbutton to connect to the demo host, running athttps://diplomatic-cloudflare-host.root-a00.workers.dev.First the
HOSTlight will activate, indicating a host is configured in the client. Then theLINKlight will activate, indicating a WebSocket connection with the host is live.Notice that the upload queue count drops to zero upon connecting.
Open TODO in a new browser window, use your password manager to fill the same seed (if necessary), then link and observe that the second browser window gets into sync with the first.
Code Walkthrough
Here is a line-by-line breakdown of that code.
Imports
import './App.css'
import consts from './consts.json';
import { useCallback, useState } from 'react';
import { DiplomaticClient, htob, idbStore, EntityDB, btoh } from '@interncom/diplomatic'
import { ClientStatusBar, InitSeedView, useStateWatcher, useClientState, useSyncOnResume } from '@interncom/diplomatic';
import Todo from './Todo';
Import CSS for style, React utilities, and various pieces of the DIPLOMATIC client library.
Operation Type
export interface ITodo {
  text: string;
  done?: boolean;
}
const opType = 'todo';
Define the data type for the app, and its corresponding operation name.
Database and State Manager
const stateManager = EntityDB.stateManager;
const client = new DiplomaticClient({ store: idbStore, stateManager });
This TODO app uses two helpers. idbStore manages the internal state of the client in an IndexedDB table. EntityDB.stateManager also uses IndexedDB, this time to manage the application state. When an operation comes in, EntityDB records its body into an IndexedDB table named entities, indexed by the operation's type, and keyed on the operation's eid (entity ID).
async function getTodos() {
  return EntityDB.db.getAllFromIndex(EntityDB.entityTableName, EntityDB.typeIndexName, IDBKeyRange.only(opType));
}
This sets up a function to list all todos. You query EntityDB records using the idbjs library.
For simple apps, this may be all you need for an application database.
For reference, the EntityDB source code looks like this.
import { openDB, type DBSchema } from 'idb';
import { Applier } from './types';
import { IOp, Verb } from './shared/types';
import { StateManager } from './state';

export const entityTableName = 'entities';
export const typeIndexName = 'entity_type';

interface IEntityDB extends DBSchema {
  entities: {
    key: Uint8Array; // TODO: try Uint8Array;
    value: {
      eid: Uint8Array;
      type: string;
      updatedAt: Date;
      body: unknown;
    };
    indexes: {
      "entity_type": "string",
    };
  }
}

export const db = await openDB<IEntityDB>('db', 4, {
  upgrade(db) {
    const store = db.createObjectStore('entities', { keyPath: 'eid', autoIncrement: false });
    store.createIndex('entity_type', 'type');
  }
});

export const applier: Applier = async (op: IOp) => {
  switch (op.verb) {
    case Verb.UPSERT: {
      const curr = await db.get('entities', op.eid);
      if (new Date(op.ts) > (curr?.updatedAt ?? "")) {
        await db.put('entities', { eid: op.eid, type: op.type, updatedAt: new Date(op.ts), body: op.body });
      }
      break;
    }
    case Verb.DELETE: {
      await db.delete('entities', op.eid);
      break;
    }
  }
};

export const stateManager = new StateManager(applier, () => db.clear('entities'));
App Component
export default function App() {Set up a React function component.
useSyncOnResume(client);Sync the client after network connectivity resumes.
DSL State Observation
const state = useClientState(client);Watch for changes to the client’s state, which looks like this:
export interface IDiplomaticClientState {
  hasSeed: boolean;
  hasHost: boolean;
  connected: boolean;
  numUploads: number;
  numDownloads: number;
}
This is what the client’s state looks like. Well, at least the state it exposes via useClientState.
Host Management
const link = useCallback(() => { client.registerAndConnect(hostURL) }, []);A function to link the DSL to the host.
App State Observation and Mutation
const todos = useStateWatcher(stateManager, opType, getTodos);Observe changes to todos using the previously-defined getTodos function that queries EntityDB.
const [valueField, setValueField] = useState("");
const handleSubmit = useCallback(async (evt: React.FormEvent) => {
  evt.preventDefault();
  const todo: ITodo = { text: valueField };
  client.upsert<ITodo>(opType, todo);
  setValueField("");
}, [valueField]);
Manage the new todo text field. On each (submitted) change, apply an UPSERT to add a new todo.
const handleChange = useCallback(async (eid: string, text: string, done: boolean) => {
  const todo: ITodo = { text, done };
  client.upsert<ITodo>(opType, todo, htob(eid));
}, []);

const handleDelete = useCallback(async (eid: string) => {
  client.delete(opType, htob(eid));
}, []);
Handle checking and deleting todos.
Loading
if (!client || !state) {
  return null;
}
Wait for the client state to load before presenting UI.
Status Bar
return (
    <>
      <ClientStatusBar state={state} />
Show a status bar based on the DSL’s state.
This is what the status bar looks like. For convenience, the DIPLOMATIC client library provides this component.
UI Hierarchy
{state.hasSeed ? (
  <>
    <h1>TODO</h1>
    {todos?.map((ent) => {
      const todo = ent.body as ITodo;
      const hex = btoh(ent.eid);
      return <Todo key={hex} eid={hex} todo={todo} onChange={handleChange} onDelete={handleDelete} />;
    })}
    <form onSubmit={handleSubmit} style={{ marginBottom: 48, marginTop: 18 }}>
      <input id="value-input" type="text" value={valueField} onChange={(evt) => setValueField(evt.target.value)} placeholder="Type a todo ↵" style={{ width: "100%", boxSizing: 'border-box', padding: 4 }} />
    </form>
    {
      state.hasHost
        ? <button type="button" onClick={client.disconnect}>UNLINK</button>
        : <button type="button" onClick={link}>LINK</button>
    }
    <button type="button" onClick={client.wipe}>EXIT</button>
  </>
If the DSL has a seed loaded, present the main UI, including a list of all todos and a control to add new ones, and controls to link/unlink from the host as well as clear the DSL’s seed (ensure you’ve saved it first!)
<InitSeedView client={client} path="/" />If the DSL doesn’t have a seed, present a view to generate and store a seed. For convenience, DIPLOMATIC provides this view in the client library.
Todo Component
import { ITodo } from "./App";

interface IProps {
  eid: string;
  todo: ITodo;
  onChange: (eid: string, text: string, checked: boolean) => void;
  onDelete: (eid: string) => void;
}
export default function Todo({ eid, todo, onChange, onDelete }: IProps) {
  return (
    <div key={eid} style={{ display: 'flex', alignItems: 'center', margin: '4px 0' }}>
      <input
        type="checkbox"
        checked={todo.done ?? false}
        onChange={e => onChange(eid, todo.text, e.target.checked)}
        style={{ marginLeft: 0 }}
      />
      <div style={{ flex: 1, textAlign: 'left' }}>{todo.text}</div>
      <a style={{ cursor: 'pointer' }} onClick={() => onDelete(eid)}>x</a>
    </div>
  );
}
Render an individual todo with controls to check and delete it.
Summary
This TODO demo shows how to use the built-in EntityDB as your application database.